The publish describes steps to make an inexpensive yet strong remote controlled trolley which happen to be maneuvered left, right, forward and reverse as needed, by the user utilizing the presented remote handset. The concept will not depend upon an MCU circuit.
In one of my earlier articles I mentioned concerning a basic remote controlled toy car circuit, the present idea of a remote controlled trolley is motivated with similar idea but is meant to serve for delivering impressive and significantly more substantial loads.
This design might be particularly suitable and available for malls or shopping retail outlets where it might be applied as a small transport vehicle for transporting material within the compound or the premise with the aid of a couple of presses of the remote Tx unit.
The initial step in developing the offered remote controlled trolley should be to select a couple of standard Rx/Tx RF components either from your local electronic dealer or from any specific online store, I suggest buying from an online store as it could be much simpler and handy, although more expensive.
The obtained units would appear as demonstrated below:

The left side brown color unit is the Tx or the transmitter unit while the adjoining circuit broad is the Rx or the receiver unit.
The Tx unit can be viewed with 4 red colored buttons marked as A, B, C, D, along with the Rx board might be observed getting 4 relays (black color boxes).
The four specific buttons of the Tx module are wirelessly combined for performing the four related relays of the Rx module.
You can observe connectors fixed around the sides of the board (green colored), these types of connectors are properly terminated with the (+) (-) supply inputs for the Rx board as well as with the relay contacts, for all the 4 relays.
A relay, as we all know includes 5 basic contacts and their pinouts viz: 2 pins for the coil, one for the pole and one each for the N/C and the N/O.
Because there are 4 relays in the Rx unit, it will be possible to find 5 x 4 = 20 outputs related to the related connector points.
It may be a very difficult activity to individually seek out these types of relay terminations on the connectors, therefore I like to recommend soldering wires directly on the relay pinouts to be able to save yourself from the above activity, this attempt is going to be needed afterwards while we engage the unit with the trolley's control circuit.
Constructing the relay control circuit for the trolley
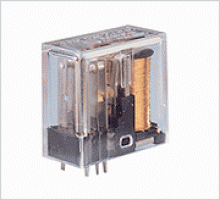
For this purpose you prefer a couple of relays and diodes. The relays ought to be appropriately rated to be able to manage the high power wheel motors of the trolley. I would recommend utilizing OEN make relays for this, as demonstrated in this article image:
12V, 285 ohms, 10 amp relay
The diodes which is able to be needed in the relay driver circuit may be our standard 1N4007 diodes.
The circuit information for the same might be observed right here diagram:

Utilizing the above specific relays along with the diodes you simply must complete constructing the above relay driver circuit board which might be simply completed on a piece of veroboard.
After this we certainly have a significant activity at our disposal which is developing the green wires demonstrated in the above diagram with the remote control Rx board.
Before the integration we are going to need to place certain mods in the Rx module, as described below:
Utilizing pieces of insulated wires, properly stripped and tinned at the ends go on linking (by soldering) all the pole pins of the relay and link this common joint with the positive line of the Rx board.
At this point within this circumstance we are able to believe that when the relays are not in an activated condition (through the remote handset) the pole positive input of each relay is going to be associated with their specific N/C points, just in case activated the positive from the pole will certainly shift and get associated with the suitable N/O points.
In brief, on activation the N/O contact will get the positive supply thereby we have been excited about this constructive supply from the N/O contacts since these is going to be initiated only after the relays are triggered, signifying that when the Tx (transmitter) buttons are pressed.
Consequently all the related N/O pinouts needs to be connected to the green wires of the above indicated relay driver circuit.
As soon as this is achieved, the Rx will probably be incorporated with the relay driver module for performing all the proposed methods of the remote controlled trolley, that is: the forward, reverse, motions and the left, right turns.
Powering the relay Driver Board
Considering that the relays in the relay driver phase could be accountable for moving the heavy motors associated with the trolley wheel,the supply for this purpose will have to be equivalently strong, consequently deep cycle lead acid batteries turn out to be excellent for this application.
Considering the motors to be rated at 12V, a 40AH lead acid battery could be adequate for allowing the trolley to move despite more substantial loads.
Configuring the Wheels with the Motors for the Meant methods
As might be observed in the following figure, the mentioned remote controlled trolley would require 4 wheels for suporting and rolling the system.
In spite of this merely the front two wheels could be accountable for making it possible for the intended reverse, forward, right and left methods, thereby the motors could be required to be clamped using these two front wheels of the trolley, as demonstrated in the following image:

The rear wheels are simply dummy wheels, fixed only for permitting a free rolling of the trolley, in accordance with the front wheel instructs.
As might be noticed in the above image, the module labeled as PCB assembly is the relay driver board, the remote module indicates the Rx remote receiver board while the battery is the 40 AH 12V battery which we mentioned in the earlier portion of the article.
After assembling you might have to tweak and verify the motor wire connections with the relay driver board.
For a forward and reverse motion both the motors needs to be along with one another, however for performing a right or a left flip, the motors should undergo an opposite rotational movement.
If you discover the motor not behaving in the above manner, it might be most likely sorted out by simply swapping the polarity of one of the motors. This tends to instantly correct the circumstance and force the motors to make use of the described methods.
Lastly the A. B, C, D buttons might be properly matched or interchanged for the any of the specific methods by tweaking the green wire links with the Rx module, according to the users desire.
In one of my earlier articles I mentioned concerning a basic remote controlled toy car circuit, the present idea of a remote controlled trolley is motivated with similar idea but is meant to serve for delivering impressive and significantly more substantial loads.
This design might be particularly suitable and available for malls or shopping retail outlets where it might be applied as a small transport vehicle for transporting material within the compound or the premise with the aid of a couple of presses of the remote Tx unit.
The initial step in developing the offered remote controlled trolley should be to select a couple of standard Rx/Tx RF components either from your local electronic dealer or from any specific online store, I suggest buying from an online store as it could be much simpler and handy, although more expensive.
The obtained units would appear as demonstrated below:
The left side brown color unit is the Tx or the transmitter unit while the adjoining circuit broad is the Rx or the receiver unit.
The Tx unit can be viewed with 4 red colored buttons marked as A, B, C, D, along with the Rx board might be observed getting 4 relays (black color boxes).
The four specific buttons of the Tx module are wirelessly combined for performing the four related relays of the Rx module.
You can observe connectors fixed around the sides of the board (green colored), these types of connectors are properly terminated with the (+) (-) supply inputs for the Rx board as well as with the relay contacts, for all the 4 relays.
A relay, as we all know includes 5 basic contacts and their pinouts viz: 2 pins for the coil, one for the pole and one each for the N/C and the N/O.
Because there are 4 relays in the Rx unit, it will be possible to find 5 x 4 = 20 outputs related to the related connector points.
It may be a very difficult activity to individually seek out these types of relay terminations on the connectors, therefore I like to recommend soldering wires directly on the relay pinouts to be able to save yourself from the above activity, this attempt is going to be needed afterwards while we engage the unit with the trolley's control circuit.
Constructing the relay control circuit for the trolley
For this purpose you prefer a couple of relays and diodes. The relays ought to be appropriately rated to be able to manage the high power wheel motors of the trolley. I would recommend utilizing OEN make relays for this, as demonstrated in this article image:
12V, 285 ohms, 10 amp relay
The diodes which is able to be needed in the relay driver circuit may be our standard 1N4007 diodes.
The circuit information for the same might be observed right here diagram:

Utilizing the above specific relays along with the diodes you simply must complete constructing the above relay driver circuit board which might be simply completed on a piece of veroboard.
After this we certainly have a significant activity at our disposal which is developing the green wires demonstrated in the above diagram with the remote control Rx board.
Before the integration we are going to need to place certain mods in the Rx module, as described below:
Utilizing pieces of insulated wires, properly stripped and tinned at the ends go on linking (by soldering) all the pole pins of the relay and link this common joint with the positive line of the Rx board.
At this point within this circumstance we are able to believe that when the relays are not in an activated condition (through the remote handset) the pole positive input of each relay is going to be associated with their specific N/C points, just in case activated the positive from the pole will certainly shift and get associated with the suitable N/O points.
In brief, on activation the N/O contact will get the positive supply thereby we have been excited about this constructive supply from the N/O contacts since these is going to be initiated only after the relays are triggered, signifying that when the Tx (transmitter) buttons are pressed.
Consequently all the related N/O pinouts needs to be connected to the green wires of the above indicated relay driver circuit.
As soon as this is achieved, the Rx will probably be incorporated with the relay driver module for performing all the proposed methods of the remote controlled trolley, that is: the forward, reverse, motions and the left, right turns.
Powering the relay Driver Board
Considering that the relays in the relay driver phase could be accountable for moving the heavy motors associated with the trolley wheel,the supply for this purpose will have to be equivalently strong, consequently deep cycle lead acid batteries turn out to be excellent for this application.
Considering the motors to be rated at 12V, a 40AH lead acid battery could be adequate for allowing the trolley to move despite more substantial loads.
Configuring the Wheels with the Motors for the Meant methods
As might be observed in the following figure, the mentioned remote controlled trolley would require 4 wheels for suporting and rolling the system.
In spite of this merely the front two wheels could be accountable for making it possible for the intended reverse, forward, right and left methods, thereby the motors could be required to be clamped using these two front wheels of the trolley, as demonstrated in the following image:

The rear wheels are simply dummy wheels, fixed only for permitting a free rolling of the trolley, in accordance with the front wheel instructs.
As might be noticed in the above image, the module labeled as PCB assembly is the relay driver board, the remote module indicates the Rx remote receiver board while the battery is the 40 AH 12V battery which we mentioned in the earlier portion of the article.
After assembling you might have to tweak and verify the motor wire connections with the relay driver board.
For a forward and reverse motion both the motors needs to be along with one another, however for performing a right or a left flip, the motors should undergo an opposite rotational movement.
If you discover the motor not behaving in the above manner, it might be most likely sorted out by simply swapping the polarity of one of the motors. This tends to instantly correct the circumstance and force the motors to make use of the described methods.
Lastly the A. B, C, D buttons might be properly matched or interchanged for the any of the specific methods by tweaking the green wire links with the Rx module, according to the users desire.
No comments:
Post a Comment